Cucusoft iPod to Computer Transfer is an easy to use iPod/iPhone utility designed to help you backup all your files from your iPod, iPhone, iTouch. Recover lost or missing music or backup and restore all of your iPod/iPhone/iTouch content including your favorite songs, videos, photos, Play Lists and more. If you have any iPod/iPhone device, this software is a 'must have' utility to keep your iPod/iPhone safe. Download Trial | Buy ($29.95)
Desktop Icons are small picture that typically represents a program or file. Double-clicking an icon opens the associated program or file. But sometimes there are icons in our desktop that needs to be removed because you?re not using them or it is unnecessary.
To remove unused desktop icons 1. Open Display in Control Panel. 2. On the Desktop tab, click Customize Desktop. 3. Under Desktop cleanup, click Clean Desktop Now. 4. Follow the directions in the Desktop Cleanup Wizard. Notes 1. To open Display, click Start, click Control Panel, and then double-click Display. 2. The Desktop Cleanup Wizard displays a list of the desktop icons that have not been used for 60 days or more, enabling you to remove those icons that you don't want on your desktop. You can retrieve icons you have removed by opening the Unused Desktop Shortcuts folder on your desktop. 3. Clear the Run Desktop Cleanup Wizard every 60 days check box if you don't want the wizard to run automatically every two months. 4. You can remove an individual desktop icon by right-clicking the icon and then clicking Delete. 5. To add or remove the icons for My Documents, My Computer, My Network Places, or Internet Explorer, select or clear those items under Desktop icons.
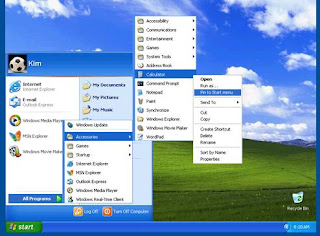
Want to keep your programs within easy reach? Windows XP lets you customize the Start menu and task bar so you can launch your favorite programs whenever you want them. No more searching for your favorite programs; you can easily pin, or assign, programs to the Start menu. Or you can use the Quick Launch bar as a way to keep other programs at your fingertips; ready to go at the click of the button. You can also place convenient shortcut icons on your desktop. Shortcut icons provide instant links to important files, folders, and other applications - even your printer and Internet connection - with a touch of your mouse. Here's how to pin a program to the Start menu. As an example, we'll pin the Windows XP Calculator program to the Start menu.
Pin Calculator to the Start menu 1. Click Start, and then click All Programs. 2. Click Accessories and point to Calculator. 3. Right-click Calculator and click Pin to Start menu. 4. Click anywhere on the desktop to quit the Startmenu.
That's all there is to it. The above works for any program on your computer, putting those programs on the Start menu until you decide to remove them.
The customizing features of Windows XP offer more than just visual tweaks. You can also add sound effects - silly or sensible - to orchestrate any move, from opening and closing folders to emptying the Recycle Bin. Sound effects are a perfect complement to any customized desktop and a great way to express your personality. Adding them is easy, too. Here's how:
Add sound effects 1. Click Start, and then click Control Panel. 2. Click Sounds, Speech, and Audio Devices. 3. Under Pick a task, click Change the sound scheme. 4. On the Sounds tab, under Program events, click the event to which you want to apply a sound. 5. In the Sounds list, click the sound you want to link to the event. 6. To hear the sound, click the playbutton to the right of the Sounds list. If you are satisfied with your choice, click OK. Repeat steps 4 and 5 until you have linked sounds to as many program events as you want. 7. To save your settings into a personalized sound scheme, click Save As. Type a name for the sound scheme, and then click OK. 8. Click OK to complete the procedure and save your sound scheme.
While Windows XP contains many sound effects to choose from, you can create your own by copying them from other sources, such as CDs or the Internet, and storing them on your hard drive.
Customize your desktop's background! You can repaint it any color of the rainbow, or fill it with a pattern, image, or favorite photo. Windows XP contains a selection of backgrounds to choose from. You can also capture photos and other graphics on the Web. Here's how to give your desktop a fresh look:
1. Open Display in Control Panel. 2. On the Desktop tab, do one or more of the following: 3. Click a picture in the Background list. In Position, click Center, Tile, or Stretch. 4. Click Browse to search for a background picture in other folders or on other drives. You can use files with the following extensions: .bmp, .gif, .jpg, .dib, .png, .htm. In Position, click Center, Tile, or Stretch. 5. Select a color from Desktop color. The color fills the space not used by a picture.
Notes You can use a personal picture as a background. All of your personal pictures located in My Pictures are listed by name in the Background list. You can save a picture from a Web site as a background. Right-click the picture and then click Set as Background. The picture is listed in the Background box as Internet Explorer Background. If you choose an .htm document as your background picture, the Position options are unavailable. The .htm document is automatically stretched to fill your background.
Brighten your work area when your computer is idle by adding a colorful screen saver. Windows XP contains a large selection. Here?s how to add a colorful screen saver.
Choose a screen saver 1. Click Start, and then click Control Panel. 2. Click Appearance and Themes. 3. Under Pick a task, click Choose a screen saver. 4. On the Screen Saver tab, in the Screen saver list, click the screen saver you want. 5. Click Preview to view the screen saver for a few seconds (move your mouse or press any key to end the preview), and then click Settings to customize its behavior. 6. When you are satisfied with your choice, click OK.
Want a screen saver with extra personality? Choose My Pictures Slideshow from the drop-down menu, and then click Settings to add favorite photos from your hard drive.


 0.00 out of 10 (0 Votes)